Designer : My Cosy Crochet Sanctuary
Instagram: @mycosycrochetsanctuary
Hello everyone who loves amigurumi…
Today I shared the amigurumi shark crochet pattern for you. Below you will find a step-by-step tutorial of this pattern and you will complete it without any difficulty. Thanks to the creator for this cute pattern.

Amigurumi cats, amigurumi dolls, amigurumi dogs, amigurumi unicorns, amigurumi lambs, amigurumi dinosaurs, amigurumi foxes, amigurumi bears, amigurumi giraffes, amigurumi pigs, amigurumi birds, amigurumi bunny, amigurumi elephants, amigurumi hippos, amigurumi monkeys… All the amigurumi toy crochet patterns and ideas you are looking for are here. Have a great time…Don’t forget to visit our YouTube channel…
Materials and tools
7mm hook
Blanket yarn
Stitch markers
Stuffing
20mm safety eyes
Tapestry needle
Scissors
Black thread or felt to embroider face details such as mouth and gills.
Abbreviations
MR: Magic ring
R: Round
Sc: Single crochet
Inc: Increase
Dec: Decrease
Hdc: Half double crochet
Hdc inc: Half double crochet increase
Finished size: 44 cm x 20 cm.
AMIGURUMI SHARK BRUCE FREE CROCHET PATTERN
Dorsal fin
R1. MR: 3 sc, 2 hdc, 1 sc (6)
R2. 3 sc, 2 hdc, inc, 1 sc (8)
R3. 3 sc, 1 hdc inc, 2 hdc, 1 hdc inc, 1 sc (10)
R4. 3 sc, 6 hdc, 1 sc (10)
R5. sc all around (10)
Fasten off and leave a long enough tail for sewing.
Stuff the fin for it to keep the shape.
Pectoral fin
R1. in MR: 3 sc, 2 hdc, 1 sc (6)
R2. 3 sc, 1 hdc inc, 1 hdc, 1 sc (7)
R3. 3 sc, 2 hdc, 1 hdc inc, 1 sc (8)
R4. 3 sc, 1 hdc inc, 3 hdc, 1 inc (10)
R5. 3 sc, 1 hdc, 1 hdc inc, 3 hdc, 1 sc, 1 inc (12)
R6. 3 sc, 6 hdc, 3 sc (12)
R7. sc all around (12)
R8. Crochet both sides together with 6 sc (6)
Fasten off and leave a tail long enough for sewing.
Tail
Small part:
R1. 4 sc in MR (4)
R2. (1sc,1inc)x2 (6)
R3. (2sc,1inc)x2 (8)
R4. (3sc,1inc)x2 (10)
Fasten off and leave a tail for closing the gap before round 2 of joining.
Joining:
R1. 2 sc, 3 dec, 1 sc, join with the first stitch of small fin using 1 sc, 1 sc, 5 dec, 1 sc (14)
R2. 1 sc, 2 dec, 2 sc, 3 dec, 1 sc (9)
R3. (1sc,dec)x3 (6)
Big part:
R1. 4 sc in MR (4)
R2. (1sc,1inc)x2 (6)
R3. (1sc,1inc)x3 (9)
R4. (2sc,1inc)x3 (12)
R5. sc all around (12)
Do not cut, stuff both fins and continue with joining.
Body
R1. (1sc,1inc)x3 (9)
R2. sc all around (9)
R3. (2sc,1inc)x3 (12)
R4. (2sc,1inc)x4 (16)
R5. sc all around (16)
R6. (3sc,1inc)x4 (20)
R7. 2 sc, (1inc,3sc)x2, 2 sc, (3sc,1inc)x2 (24)
R8. (3sc,1inc)x6 (30)
R9-10. sc all around (30) / for 2 rounds.
R11. (4sc,1inc)x6 (36)
Start stuffing.
R12. sc all around (36)
R13. (5sc,1inc)x6 (42)
R14. (6sc,1inc)x6 (48)
R15-16. sc all around (48) / for 2 rounds.
R17. (6sc,1dec)x6 (42)
R18. (5sc,1dec)x6 (36)
R19. (4sc,1dec)x6 (30)
R20. sc all around (30)
Add safety eyes between row 18-19.
R21. (3sc,1dec)x6 (24)
R22. sc all around (24)
R23. (1sc,1dec)x8 (16)
R24. sc all around (16)
R25. 4 sc, 4 dec, 4 sc (12)
Finish stuffing the body.
R26. dec all around (6)
Close the head.
Sewing fins
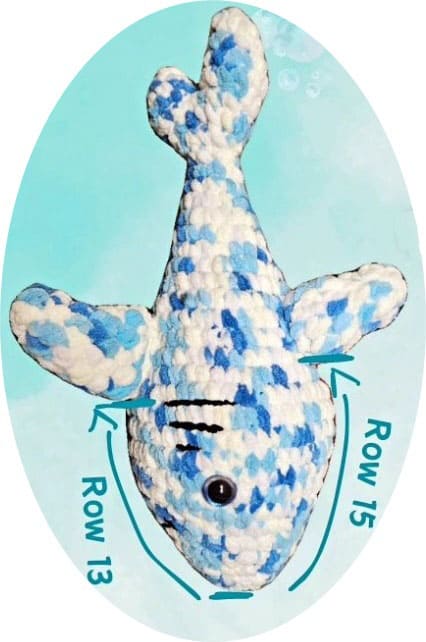
Sew the pectoral fins on either side of the sharks body around rows 13 from the mouth.
The tail should have the big part facing upward when doing this.
Sew the dorsal fin in the centre of the shark top around 2 rows back from the pectoral fins.

Embroider gills
Cut a piece of black yarn about 20 cm/8 inches.
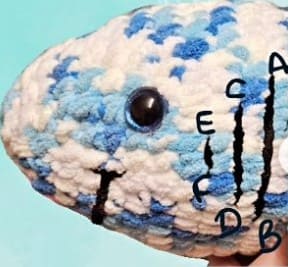
Just before the front edge of the pectoral fin, embroider 3 vertical lines decreasing by 2 stitches in length toward the mouth that are about a stitch apart from each other.
Entering from bottom of the shark and out point A, enter B (approximately 7 stitches apart) and exit C, (two rows toward the mouth and 1 stitch lower than A) then enter D (approximately five stitches apart) and exit E (two rows toward the mouth, and one stitch down from B) and finally enter F (approximately 3 stitches apart) and out from the bottom of the shark. Fasten off and weave in ends.

Embroider mouth
Cut a piece of black yarn about 20 cm/ 8 inches.
Embroider the mouth as such:
Insert your needle under the head, and bring it up where your mouth starts. Draw the yarn through, leaving a short yarn tail.
Insert your needle about 8 stitch to the left and pulling your needle to another point through the center of the mouth.
Insert your needle in the same spot but around the black thread.
Pull your needle through the right side of the mouth about 1 stitches up diagonally.
Put your needle downward about 2 stitch and go through the other side of the mouth about 1 stitch down diagonally. Go up about 2 stitch.
Use your needle to go through the same spot to the starting point under the head.
Bruce the crochet shark is ready!
More amigurumi shark ideas:


