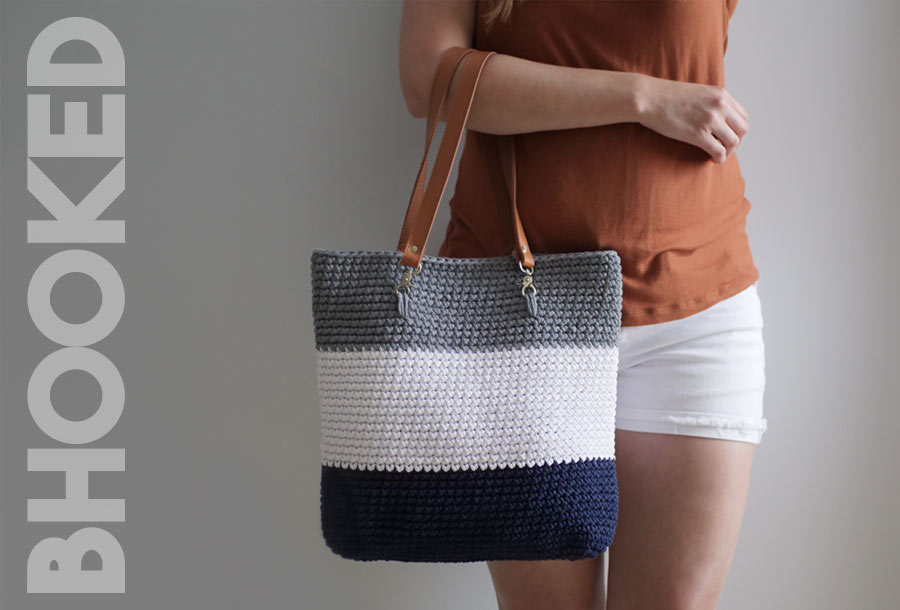
Made of macramé cord, this simple crochet purse is the definition of sturdy and functional.
Skill Level | Easy
Finished Size | 14″ wide; 14″ tall (lying flat)


introduction
About this Pattern
If you normally shy away from crocheting purses because they turn out too floppy or fragile, you’ll be pleasantly surprised with this one. The use of macramé cord makes this one of the most sturdy and functional crochet purses.
With this project you’ll get to practice your single crochet skills, changing colors and working with a new material. With only three rounds of increases, this purse makes for an excellent couch project. You’ll also get to practice the invisible join if you follow along with the tutorial, a skill that can be used for all sorts of projects. Use three colors like we did, use a single color, two colors…whatever you prefer.
Before you begin, review this page entirely so you understand the full scope of the project. We have a list of recommended supplies and abbreviations here on this page as well as written instructions and a tutorial to walk you through our simple crochet bag step-by-step.
getting started
Recommended Supplies
- Approx 320 yds total; 3 mm Macramé cord
- 22″ Purse Handles
- 6.5 mm Crochet Hook
- Yarn Needle
- Scissors
FAQ: Can I use a different yarn?
Technically you could use a bulky weight yarn for this project as well. However, macramé cord is what makes this purse sturdy and functional so we recommend you give that a try.
Yarn Substitution Resources:
The Ultimate Guide to Substitute Yarn
Not an Amazon Prime member? Get a free 30 day trial on us so you can unlock unlimited, free, two-day shipping on all sorts of stuff (yes, even yarn!) and instant access to thousands of movies, TV shows and books. Try Amazon Prime Free for 30 Days
Disclosure: As an Amazon Associate (and at no additional cost to you) I earn a small commission from qualifying purchases if you use the links below. Please understand I have experience with these products & recommend them because they are optimal for this pattern, not because of the commission I make as a result of you buying them. Using these links is not required but is a big support!
pattern notes
Additional Notes
Finished Size
14″ wide; 14″ tall (lying flat)
Gauge
10.5 stitches x 12 rounds = 4″
worked in single crochet
Additional Notes:
This bag is crocheted from the bottom starting with an oval base and worked upward in a spiral fashion. Our example and pattern include instructions for three stripes, however, you can get creative with the coloring! Make it solid, have two stripes or many stripes. Whichever you prefer.
printable pattern
Need to print this pattern?
You’ll find the full pattern for free here on this page. However, if you’d like to have a PDF version to print or save for offline use, you can purchase it from our shop.
the pattern
Written Instructions
Round 1: With color A, ch 23. Sc in 2nd ch from hk and in each ch to the last. 4 sc in last ch, rotating work around so you can see the underside of the ch. Sc in the bottom of each ch to the last. 3 sc in last ch. (48 sts)
Round 2: 2 sc in first st. Sc in each of the next 20 sts. 2 sc in next 4 sts. Sc in next 20 sts. 2 sc in last 3 sts. (56 sts)
Round 3: 2 sc in first 2 sts. Sc in next 20 sts. 2 sc in next 8 sts. Sc in next 20 sts. 2 sc in next 6 sts. (72 sts)
Round 4: Sc in every st. (72 sts)
Repeat: Rep last round until work measures 5” from bottom.
Break color A and join color B.
Cont to rep round 4 until work measures 10” from bottom.
Break color B and join color C.
Cont to rep round 4 until work measures 14” from bottom.
Make 4 slst to gradually correct the jog from crocheting in a spiral. Fasten off and weave in the ends.
Handle Assembly
Step 1: Measure 4” inward and place a marker in the color C stripe, four rows up from color B.
Step 2: Cut four 14” strands of color C.
Step 3: Thread one strand on yarn needle. Working from inside-out, run strand through at the place of your marker. Run the needle straight up three rows from marker and into the bag. Repeat three more times.
Step 4: Tie a knot with the two ends on the inside.
Step 5: Clip strap to the loops you just created.
Repeat step 2 through 5 for other handle.
By using this pattern, you agree to our terms of use:
This pattern is for personal use only. You agree not to modify, publish, transmit, sell, create derivative works or in any way exploit any of the content within this page, in whole or in part. If you wish to share this pattern, share a link to this webpage only. You may sell finished items made from this pattern.
Copyright, B.Hooked Crochet, LLC
see how it’s done
Step-by-Step Tutorial
Video not displaying? Watch this tutorial on YouTube instead.
Left-Handed Tutorial on YouTube
Right-Handed Tutorial on YouTube


