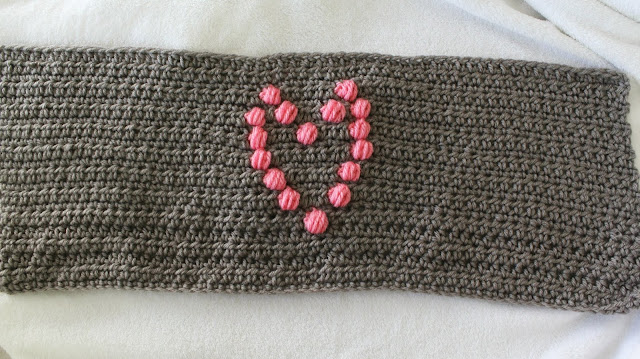
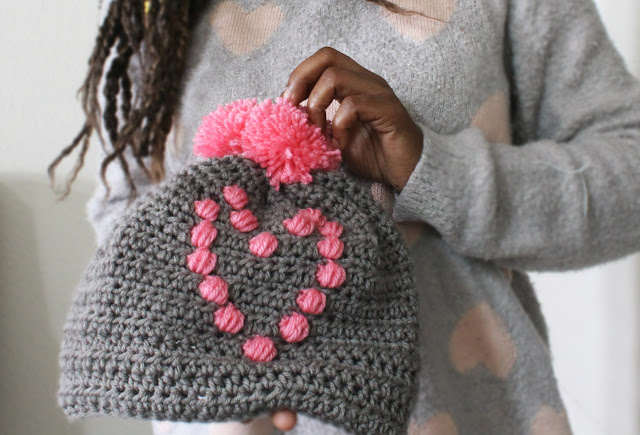
Hello there and Happy Tuesday to you! For the week of Valentine’s, here is a cute little accessories to share in the festivities and the best thing is that its handmade.
THE INGREDIENTS
Less than half a skein of Grey and Pink from Red Heart Super Saver/Medium 4/ 100% Acrylic // 364 yards
H/8 5.00MM Crochet Hook
Yarn Needle
Craft Scissors
GAUGE
4″= 5 STS
4″=7 Rows
49X29
ABBREVIATIONS/STITCHES UTILIZED
sc=single crochet
hdc=half double crochet
hdc blo slst=back loop half double crochet
dc=double crochet
tch[s]=turning chain[s]
sts=stitches
sl st= slip stitch
ch=chain
THE PATTERN
STEP ONE
Chain FOR 57 STS/ 18 INCHES LENGTH/ 10 INCHES WIDTH
Grey
R1: SC into all of the STS for the entire row, at the end of the row, turn work utilizing turning chain to continue.
R2: HDC into all of the STS for the entire row, at the end of the row, turn work utilizing turning chain to continue.
R3: SC into all of the STS for the entire row, at the end of the row, turn work utilizing turning chain to continue.
R4: HDC into all of the STS for the entire row, at the end of the row, turn work utilizing turning chain to continue.
R5: SC into all of the STS for the entire row, at the end of the row, turn work utilizing turning chain to continue.
R6: HDC into the first 28 STS [change colors to Pink to create a PUFF STITCH] then HDC the remaining the 28 STS, at the end of the row, turn work utilizing turning chain to continue.
R7: SC into all of the STS for the entire row, at the end of the row, turn work utilizing turning chain to continue.
R8: HDC into the first 27 STS [change colors to Pink to create a PUFF STITCH] then HDC the remaining the 3 STS, and then [change colors to Pink to create a PUFF STITCH], then HDC the remaining STS, at the end of the row, turn work utilizing turning chain to continue.
R9: SC into all of the STS for the entire row, at the end of the row, turn work utilizing turning chain to continue.
R10: HDC into the first 26 STS [change colors to Pink to create a PUFF STITCH] then HDC the remaining the 5 STS, and then [change colors to Pink to create a PUFF STITCH], then HDC the remaining STS, at the end of the row, turn work utilizing turning chain to continue.
R11: SC into all of the STS for the entire row, at the end of the row, turn work utilizing turning chain to continue.
R12: HDC into the first 25 STS [change colors to Pink to create a PUFF STITCH] then HDC the remaining the 7 STS, and then [change colors to Pink to create a PUFF STITCH], then HDC the remaining STS, at the end of the row, turn work utilizing turning chain to continue.
R13: SC into all of the STS for the entire row, at the end of the row, turn work utilizing turning chain to continue.
R14: HDC into the first 24 STS [change colors to Pink to create a PUFF STITCH] then HDC the next 3 STS, and then [change colors to Pink to create a PUFF STITCH], then HDC the next 3 STS, and then [change colors to Pink to create a PUFF STITCH], then HDC the remaining STS, at the end of the row, turn work utilizing turning chain to continue.
R15: SC into all of the STS for the entire row, at the end of the row, turn work utilizing turning chain to continue.
R16: HDC into the first 24 STS [change colors to Pink to create a PUFF STITCH] then HDC the remaining the 1 ST, and then [change colors to Pink to create a PUFF STITCH], then HDC the next 1 ST, and then [change colors to Pink to create a PUFF STITCH], then HDC the next 1 ST, and then [change colors to Pink to create a PUFF STITCH], then HDC the remaining STS, at the end of the row, turn work utilizing turning chain to continue.
R17: SC into all of the STS for the entire row, at the end of the row, turn work utilizing turning chain to continue.
R18: HDC into the first 23 STS [change colors to Pink to create a PUFF STITCH] then HDC the next 5 STS and then [change colors to Pink to create a PUFF STITCH] then HDC the remaining STS, at the end of the row, turn work utilizing turning chain to continue.
R19: SC into all of the STS for the entire row, at the end of the row, turn work utilizing turning chain to continue.
R20: SC into all of the STS for the entire row, at the end of the row, turn work utilizing turning chain to continue.
R21: HDC into all of the STS for the entire row, at the end of the row, turn work utilizing turning chain to continue.
R22: SC into all of the STS for the entire row, at the end of the row, SL ST to complete final work.
Next, with your tapestry yarn sewing needle and a strand of yarn, sew the sides of the horizontal piece together.
Next, at the top opening for the hat, utilize the whip stitch along the top last row [22] in between the stitches, to pull the strand to secure the top of the newly constructed hat.
Also, I created two pom poms to place at the top of the hat for a little more flair!
Using the pom pom maker tool, I constructed two pom poms in Pink, utilizing the tapestry yarn sewing needle and a strand of yarn, the pom poms were sewn to the center top portion of the hat.
HAPPY CRAFTING!
#THEDREAMCROCHET
XX ashlee elle.


