[ad_1]
Designer : Nadia Iukhlina
Instagram: scandistyle_dolls
Hello everyone…
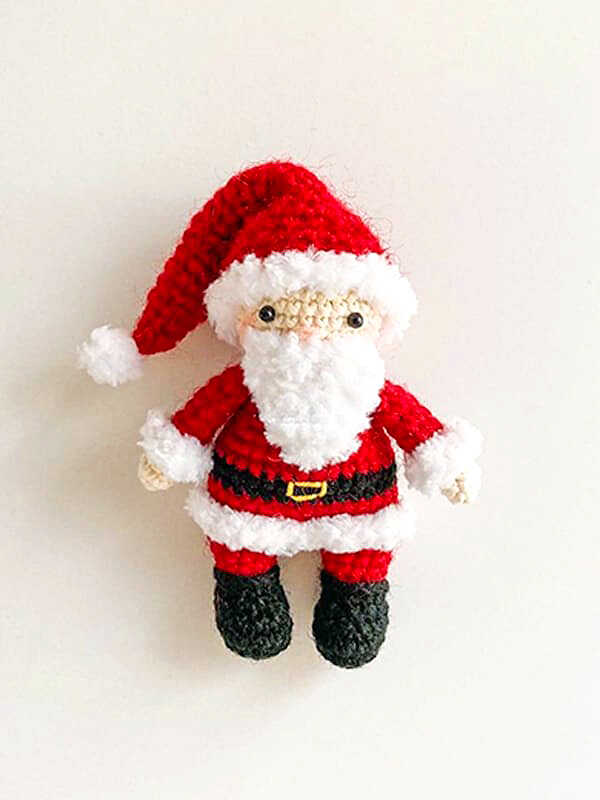
One of the free amigurumi crochet patterns we will share today is the amigurumi santa claus, whose photos and design belong to Nadia Iukhlina. You can learn how to crochet these santa claus using the free amigurumi pattern. Thanks to dear Nadia Iukhlina for this cute santa claus.
Below you will find some information about this pattern. Remember, if you have any problems, you can write to us and ask for help. You can follow our Pinterest account for free amigurumi patterns and great amigurumi ideas. Have fun…
Amigurumi cats, amigurumi dolls, amigurumi dogs, amigurumi unicorns, amigurumi lambs, amigurumi dinosaurs, amigurumi foxes, amigurumi bears, amigurumi giraffes, amigurumi pigs, amigurumi birds, amigurumi penguins, amigurumi panda, amigurumi llama, amigurumi bunny, amigurumi clowns, amigurumi elephants, amigurumi hippos, amigurumi monkeys… All the amigurumi toys pattern recipes and ideas you are looking for are here…
Don’t forget to visit our YouTube channel .…
Materials
1. Yarn (beige, black, red, white textured). I have beige- Alize Bella (180 m/50g), black- Vita Brillant (380/100g), red- Alize Angora Real 40 (480/100g), White textured- Alize Softy (115m/50g). Any yarn can be used.
2. Crochet hook, ı have clover size 1,5 mm.
3. Plastic eyes size 3 mm, glue.
4. Yellow thread for buckle.
5. Polyester fiberfill, needle, pins, scissors.
*Size of the finished toy is 8-9 cm.
Abbreviations
MR– magic ring
Ch– chain
Sc– single crochet
BLO– back loops only
Inc– increase
Dec– decrease
Slst– slip stitch
We start the construction of the cute crochet mini Santa Claus amigurumi toy from its arms.


CROCHET MINI SANTA CLAUS AMIGURUMI FREE PATTERN
Arms (Make 2)
Beige
Rnd 1: 6sc in MR
Rnd 2: (1sc,inc)*3 (9)
Rnd 3-4: 9sc (2 rounds)
Change to red.
Rnd 5: BLO 9sc
Rnd 6-10: 9sc (5 rounds)
Do not stuff, fold the arm in half and work 4sc. Cut off the thread, the arms will be crocheted into the body.
Attach a white textured yarn to 4th round and work 9sc around the arm. Cut off the thread, weave in the ends.
After completing the arms, we move on to crocheting the legs.
Legs (Make 2)
Black
Rnd 1: 6sc in MR
Rnd 2: 6 inc (12)
Rnd 3: (1sc,inc)*6 (18)
Rnd 4: 18sc
Rnd 5: 2sc,4dec,8sc (14)
Rnd 6: 2sc,2dec,8sc (12)
Work 8 more sc (to the middle of the back) and change to red.
Rnd 7: BLO 12sc
Rnd 8-11: 12sc (4 rounds)- stuff.
Cut the thread on the first leg, make the second leg similary, do not cut the thread on the second leg.
Attach the black thread to 6th round of the leg and work 12 slst around. Secure the thread, weave in the ends. Continue crocheting the body.
After crocheting her legs, it’s time to build her body.
Body
Make 3 ch from the second leg and join the chain to the first leg, then work;
Rnd 12: 12sc on the first leg, inc, 1sc, inc (increases in front), 12sc on the second leg, 3sc (32)
Rnd 13: BLO 32 sc
Rnd 14-15: 32 sc (2 rounds)
Change to black.
Rnd 16-17: 32 sc (2 rounds)
Change to red.
Rnd 18: 32 sc
Rnd 19: 2 decreases on the sides (30)
Rnd 20: (3sc,dec)*6 (24)
Rnd 21: 24 sc
Rnd 22: (2sc,dec)*6 (18)
Rnd 23: Crochet the arms in this round symmetrically on the sides, 18sc
Rnd 24: (1sc,dec)*6 (12)- stuff.
Change to beige.
Rnd 25: 12 sc
Next crochet the head, do not cut off the thread.
We crocheted the body of the crocheted Santa Claus, now we are making the head part.
Head
Rnd 26: 12 inc (24)
Rnd 27: (3sc,inc)*6 (30)
Rnd 28-33: 30 sc (6 rounds)
Rnd 34: (3sc,dec)*6 (24)
Rnd 35: (2sc,dec)*6 (18)
Rnd 36: (1sc,dec)*6 (12)- stuff the neck and head.
Rnd 37: 6 dec
Cut the thread, tighten the opening with a needle, secure the thread and weave in the ends. Attach the white textured yarn to 12th round of the body and work 32 sc around, make a slst in the end. Secure the threads, weave in the ends.
We’ve come to this point step by step, we don’t have much to do now, the process now is that magnificent beard of Santa Claus.
Beard
White textured yarn. Leave a long thread end in the beginning to use it for sewing the beard. Work in turning rows: make 1ch and turn in the end of row.
Rnd 1: 7ch, starting from the second stitch from the hook 6sc
Rnd 2: dec, 2sc, dec (4)
Rnd 3: 4 sc
Rnd 4: 2 dec
Rnd 5: 1 dec
Cut off and secure the thread, weave in the end.
After crocheting your beard, the last part remains to make the hat and then the amigurumi santa claus pattern is ready.
Hat
Make 27 ch with the red yarn and join the chain in a circle with a slst. Work in rounds.
Rnd 1-2: 27 sc (2 rounds)
Rnd 3: (7sc,dec)*3 (24)
Rnd 4-5: 24 sc (2 rounds)
Rnd 6: (6sc,dec)*3 (21)
Rnd 7-8: 21 sc (2 rounds)
Rnd 9: (5sc,dec)*3 (18)
Rnd 10-11: 18 sc (2 rounds)
Rnd 12: (4sc,dec)*3 (15)

Rnd 13-14: 15 sc (2 rounds)
Rnd 15: (3sc,dec)*3 (12)
Rnd 16-17: 12 sc (2 rounds)
Rnd 18: (2sc,dec)*3 (9)
Rnd 19: 9 sc
Rnd 20: (1sc,dec)*3 (6)
Rnd 21: 6 sc
Cut off the thread, pull the stitches with a needle, weave in the ends.
Make a pompon with the white textured yarn: make 6 sc in MR, slst into the first stitch. Leave a thread for sewing and then sew on the pompon to the tip of the hat. Next, attach the white textured yarn to the edge of the hat and work 27 sc around, make a slst in the end, secure the thread, weave in the ends.
The hat is ready.
Assembly
1. Glue on the eyes between 5th and 6th rounds of the head (counting from the beginning of crocheting the head), there are 6 sc between the eyes. Embroider a nose with the beige yarn between 4th and 5th rounds, 2 sc wide.
2. Sew on the beard under the nose.
3. Put the hat on and sew it to the head.
4. Embroider a buckle on the black belt with a fine yellow thread, width is 2 sc, height is 1 sc.
More amigurumi santa claus ideas:


[ad_2]
Source link