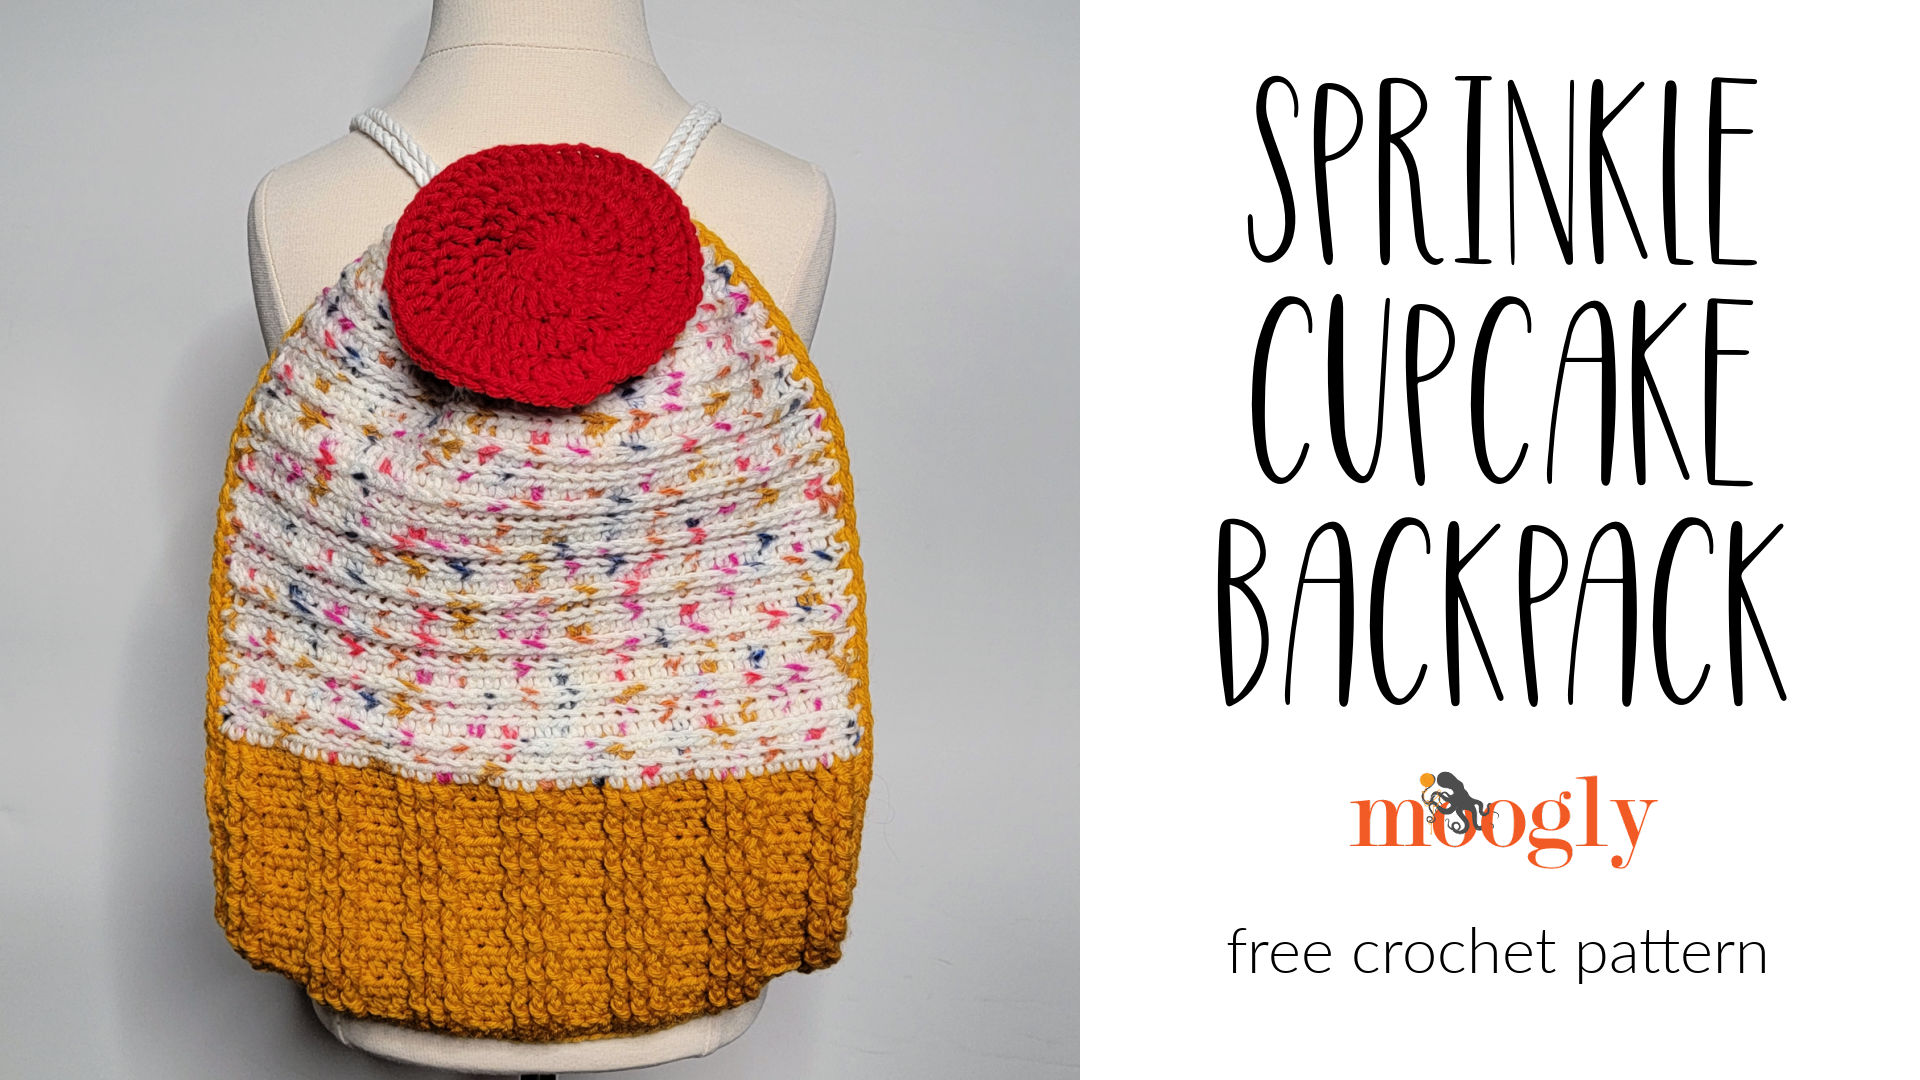
The Sprinkle Cupcake Backpack is perfect for kids, tweens, teens, and the young at heart! And of course, it’s also a free crochet pattern on Moogly! Featuring Red Heart Super Saver, it’ll stand up to every delicious adventure!
Disclaimer: This post includes affiliate links; materials provided by Yarnspirations.
Create a Tasty Treat to Tote your Goodies
You can use the Sprinkle Cupcake Backpack to tote all sorts of goodies – even Halloween candy if it’s the season! Perfect for preschoolers on up, this pattern features post stitches as well as lots of back loop and third loop texture. The back is made with rows of linked treble crochet stitches, for a solid yet lightweight fabric that works up quickly!

Grab your favorite green shade of Red Heart Super Saver Jumbo Speckle
While I used solid shades of Red Heart Super Saver solids for the cup and cherry, the “icing” of our treat bag is made with new Red Heart Super Saver Jumbo Speckle! This yarn features a new dye effect that offers a unique hand-dyed look – and is perfect for “cupcake sprinkles!” It comes in 6 different colors, so you can customize your cupcake for someone special.

Fun to Wear for Kids and Adults
This is a drawstring-style backpack, and as such has, well… long strings! As such, it should not be used by children aged 3 and under. Remember, crochet designs are not “tested for safety.” If you have a smaller child who wants their own cupcake bag, I’d recommend the free Cupcake Toddler Purse crochet pattern – you can use Red Heart Super Saver for both and make a matching set for siblings!

Sprinkle Cupcake Backpack
Add this pattern to your Ravelry Queue and Favorites
US-I, 5.5 mm hook, Susan Bates
Red Heart Super Saver Jumbo (4 – Worsted; 100% acrylic; 396 g/14 oz, 681 m/744 yds)
Color A: Gold – 250 yds
Color C: Cherry Red – 50 yds
Red Heart Super Saver Jumbo Speckle (4 – Worsted; 100% acrylic; 283g / 10 oz, 440 m/482 yds)
Color B: White Speckle – 100 yds
2 56″ long nylon or poly type cord or rope (for adult wearers, use longer cords adjusted to fit the recipient)
Gauge: 13 sts x 5 rows = 4″ in LTr after blocking
Size: approx 11.5 ” x 16″ finished

HELPFUL LINKS AND TUTORIALS
Sprinkle Cupcake Backpack – COMING SOON
FDC – Foundation Double Crochet
FSC – Foundation Single Crochet
Working into the 3rd Loop of an Hdc
Chainless Starting Double Crochet
SPRINKLE CUPCAKE BACKPACK INSTRUCTIONS:
Front of Bag
Row 1 [WS]: With Color A, FDC 39; turn. (39 sts)
Row 2 [RS]: Ch 1, hdc in first st, fpdc around next 2 sts, hdc in next 3 sts, *fpdc around next 3 sts, hdc in next 3 sts; rep from * until 3 sts rem, fpdc in next 2 sts, hdc in last st, turn.
Row 3: Ch 1, hdc in first st, bpdc around next 2 sts, hdc in next 3 sts, *bpdc around next 3 sts, hdc in next 3 sts; rep from * until 3 sts rem, bpdc in next 2 sts, hdc in last st, turn.
Rows 4 – 13: Rep Rows 2 and 3.
Row 14: Rep Row 2, break Color A and turn.
Row 15: With Color B, join to first st with hdc, hdc in each rem st across; turn.
Row 16: Ch 1, BLO hdc in each st across; turn.
Row 17: Ch 1, hdc in the front 3rd loop of each st across; turn.
Rows 18 – 35: Rep Rows 16 and 17. After Row 35, break yarn and block piece to 11″ x 15″.
Back of Bag
NOTE: If you prefer, sc sts can be substituted for LTR sts, just make the same size as the finished Front piece. Adjust the st count and row count as needed to account for personal gauge (no particular rep or mult is required).
Row 1: With Color A, FSC 34; turn. (34 sts)
Row 2 – 18: Ch 3, work LTr in each st to end; turn.
Row 19: Ch 1, sc in each st across; break yarn and block piece to 11″ x 15″.
Cherry On Top
Rnd 1: With Color B, make a magic circle, work CSDC and 11 dc into the ring; join. (12 dc)
Rnd 2: (CSDC, dc) in the first st, 2 dc in each rem st around; join. (24 dc)
Rnd 3: CSDC in the first st, 2 dc in the next st, *dc in the next st, 2 dc in the next st; rep from * around, join. (36 dc)
Rnd 4: (CSDC, dc) in the first st, dc in the next 2 sts, *2 dc in the next st, dc in the next 2 sts; rep from * around, join and finish off leaving a long tail for sewing. (48 dc)

Assembly
With Color A and WS of Front and Back held together, use stitch markers to attach pieces. Starting on one side, at the top of the bag, sc through both layers, working along the side, bottom, and other side. Add an extra sc at each bottom corner, and place a stitch marker in this corner st. Be sure to leave the top open. Do not break yarn.

WORK AROUND THE TOP OF THE BAG AS FOLLOWS:
Round 1: Ch 1, sc in each st around the top (Front and then Back Side); join to the first sc of this round. (73 sts)
Round 2: CSDC in first st, ch 1, *dc in the next st, ch 1, skip the next st; rep around, break yarn and seamless join to the 3rd ch. (37 dc, 37 ch)

ADD THE BOTTOM ROW:
With the Front side facing you, rejoin Color A to the bottom marked corner of the bag with sc, ch 2, sc in the next st, sc in each st across the bottom of the bag until 1 st remains; ch 2, sc in the last marked st of the bottom. Break yarn and weave in ends. (There are now “holes” in each bottom corner of the bag.)
ADD THE CHERRY ON TOP:
Using the long tail left on the Cherry, sew the center of the cherry to the center top of the Front of the Backpack, on the last Color B row. Only take a few stitches across the center, leaving the majority of the Cherry unattached.

ADD DRAWSTRINGS/STRAPS:
Weave each cord through the ch 1 sps of Round 2 of the top as shown below, so that both ends of each cord come out on the same side, with one cord having both ends on the right, and the other having both ends on the left.

Thread both ends of each cord through the bottom corner hole on the same side of the bag, going front to back (in on the Front/Post St side, out on the Back/Ltr side). Tie them in a knot so they won’t come back through the hole, and if using nylon/plastic cord use a lighter or match to melt the ends together (adults only please!) if desired, or let them fray below the knot. If using crochet or knitted icord, you may need to make two knots, or sew them in. Pull the drawstrings a bit so the top closes to wear.

Ready to Bag it all Up?
Ready for your next project? Check out the Moogly Free Patterns Page or Ravelry! And don’t miss our other two backpack patterns: the Cinch Stripes Backpack and Building Blocks Backpack!

If any of the Moogly patterns inspire you to make your own project, and you post a photo on social media, be sure to tag me @mooglyblog or #mooglyblog so I can check it out too!
The Fine Print
Follow Moogly on Facebook, Twitter, Pinterest, TikTok, and Instagram! Thank you to Yarnspirations for providing the materials shown in this post. Written pattern copyright Tamara Kelly 2023, all rights reserved. Please do not reprint or repost this pattern, but please do link to this page to share this pattern with others.
If you wish to make items for sale from this pattern or translate it to another language, please visit the About page for details.

