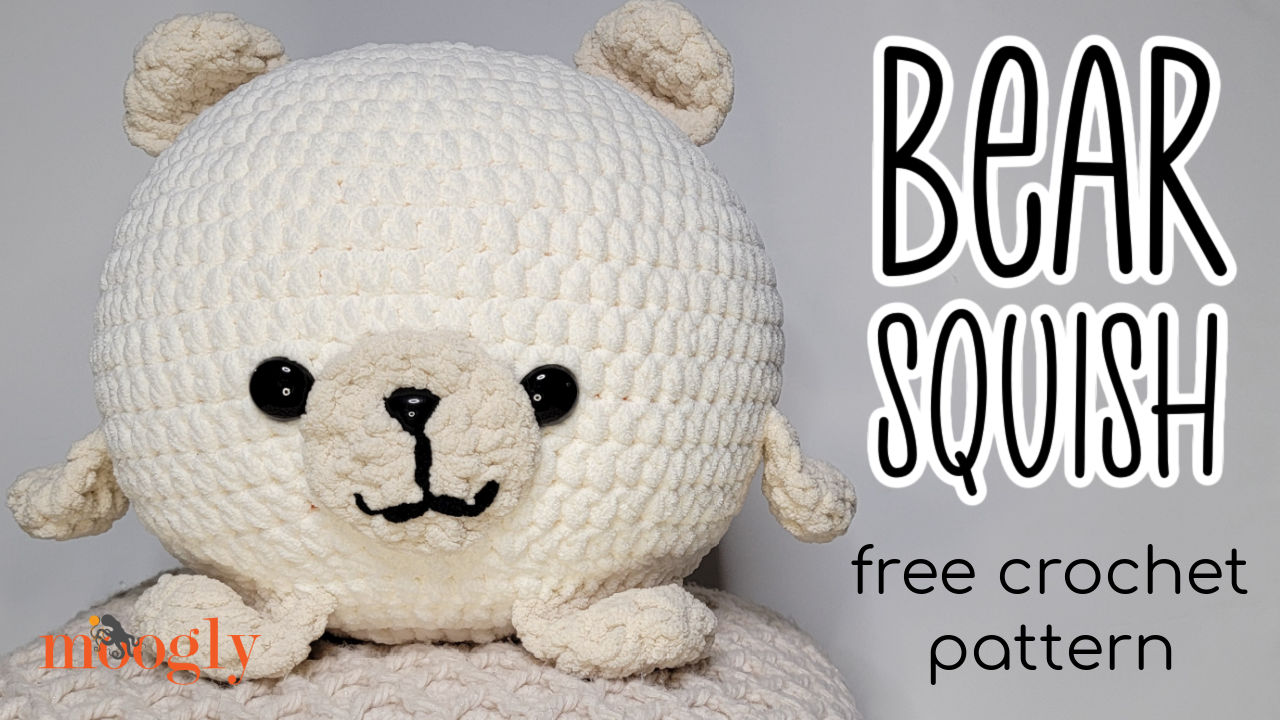
The Bear Squish is possibly the most requested animal of them all – and whether it’s a Teddy Bear Squish or Polar Bear Squish just depends on the colors of Bernat Blanket you choose! This cuddly cutie is perfect for gifting, working up quick with fuzzy and super bulky yarn – and it’s a free crochet pattern on Moogly!
Disclaimer: This post includes affiliate links; materials provided by Yarnspirations.
Part of the 2024 Giftstravaganza Blog Hop!
‘Tis the season for handmade crafting and gifting, and I’m excited to join this blog hop in its third year! How does it work?
From November 1st to December 3rd, a new handmade holiday gift idea will be released each day for you to crochet! There will be 33 free patterns — one for each day — perfect for gifts for yourself, loved ones, children, grandchildren, your crochet circle, or anyone in between! Best of all, each project requires only 1 to 3 skeins of yarn so you can use whatever you have in your stash. CLICK HERE to see all the projects so far, enter the giveaway, and follow along with the fun!

All the patterns in this blog hop are forever free on the blog of each designer. But for each pattern, you can also get a coupon code valid for 24 hours to download that day’s featured pattern as a PDF for free. To get the free PDF of the Bear Squish, CLICK HERE, add it to your Queue and Favorites, and then download it before 6am Eastern on November 27! After that time, the pattern will be free on this site, and the PDF will be available for a small fee.

Made in Quick and Easy Bernat Blanket – for Polar Bears and Teddy Bears!
As always, I chose to make the Bear Squish with Bernat Blanket, for a super cozy and cuddly teddy bear you can whip up in a weekend! I used what I had on hand, which means I made a Polar Bear Squish. But if you are looking for a Teddy Bear Squish, just switch out the colors! I recommend Taupe for Color A, and Sand for Color B. Or go bold with jewel tones, neons – that’s the joy of making it yourself!

As a 6-Super Bulky yarn, this pattern creates a 10″ toy – a little bigger once it’s stuffed! If you’d like to make it smaller – or even bigger – choose whatever yarn you like, and use whatever hook gets you a nice tight fabric. Bernat Maker Minis are a lot of fun for amigurumi!

Cute and Cuddly for Kids and Adults
This crochet bear pillow is fun to make – and pet and squeeze! I used safety eyes and a safety nose, but this pattern has not been “tested for safety for children under 3 years of age.” If you are crocheting it for a baby or toddler, you may wish to embroider on the features and make sure that the pieces are sewn on quite securely – especially that tail! If using it as a photo prop, be sure not to leave the toy with a baby unattended.

Bear Squish
Add this pattern to your Ravelry Queue and Favorites
US-L, 8.0 mm hook, Susan Bates
250 yds Bernat Blanket (6 – Super Bulky; 100% polyester; 300g/10.5 oz; 201 m/220 yds)
A: Vintage White (most of a ball)
B: Birch (less than half a ball)
C: Coal (less than 1 yard)
10″ Microbead Pillow Ball or Fiberfill
Gauge: 5″/10cm across after Rnd 3.
Size: approx 10″ across/tall excluding ears, arms, and feet
HELPFUL LINKS AND TUTORIALS
Bear Squish Tutorial – COMING SOON
NOTES:
Rounds are worked in a spiral. Do not ch 1 at the beginning of a rnd or join any rnds with a sl st unless specifically directed in the pattern.
Move a stitch marker along the first st of each rnd as you work to keep track of your progress.
Some pieces move from Rounds to Rows.
BEAR SQUISH INSTRUCTIONS:
Ears – Make 2 with Color B, leaving a long tail for sewing
Arms and Legs – Make 4 with Color B
Rnd 1: Make a magic circle, ch 1, sc in the ring, 6 hdc in the ring. (7 sts)
Rnd 2: 2 hdc in each st around. (14 sts)
Rnd 3: Hdc in next st, sc in next 5 sts, hdc in next 2 sts, sc in the next 5 sts, hdc in next st. (14 sts) Weave in your first end now.
Row 4: Fold piece flat, ch 1, sc through next st and last st, sc through next 6 sets of sts; break yarn and finish off. Set pieces aside.
Body – Make 1 with Color A
Rnd 1: With Color A, make a magic circle, ch 1, sc in the ring, 9 hdc in the ring. (10 sts)
Rnd 2: 2 hdc in each st around. (20 hdc)
Rnd 3: *Hdc in the next st, 2 hdc in the next st; rep from * around. (30 hdc)
Rnd 4: *2 hdc in the next st, hdc in the next 2 sts; rep from * around. (40 hdc)
Rnd 5: *Hdc in the next 3 sts, 2 hdc in the next st; rep from * around. (50 hdc)
Rnd 6: *Hdc in the next st, 2 hdc in the next st, hdc in the next 3 sts; rep from * around. (60 hdc)
Rnd 7: Hdc in the next 5 sts, 2 hdc in the next st, *hdc in the next 9 sts, 2 hdc in the next st; rep from * until 4 sts rem, hdc in last 4 sts. (66 hdc)
Rnd 8: *2 hdc in the next st, hdc in the next 10 sts; rep from * around. (72 hdc)
Rnd 9: Hdc in the next 8 sts, 2 hdc in the next st, *hdc in the next 17 sts, 2 hdc in the next st; rep from * until 9 sts rem, hdc in last 9 sts. (76 hdc)
Rnds 10 – 14: Hdc in each st around. After Rnd 14, use stitch markers to space Arms around RS in stitch numbers 17 – 23 and 55 – 61.
Rnd 15: Working through both layers for those stitches, hdc in each st around.
Rnd 16: *Hdc in the next 17 sts, hdc2tog; rep from * around. (72 sts)
Rnd 17: *Hdc in next 10 sts, hdc2tog; rep from * around. (66 sts)
Rnd 18: Hdc in next 5 sts, hdc2tog, *hdc in next 9 sts, hdc2tog; rep from * around until 4 sts rem, hdc in last 4 sts. (60 sts)
Rnd 19: Sc in next st, sl st in next st, break yarn and seamless join. Set Body aside.
Belly – Make 1 with Color A
Rnd 1 – 5: With Color B, rep Rnd 1 – 5 of Body. (50 hdc) Use stitch markers to space Feet around RS of Rnd 5 at st numbers 16 – 22, and 29 – 35. Use these stitch markers to attach the last row of each foot to the RS of the belly.
Rnd 6: Working through both layers for those sts, *hdc in the next st, 2 hdc in the next st, hdc in the next 3 sts; rep from * around. (60 hdc)
Rnd 7: Sc in next st, sl st in next st, break yarn, and seamless join leaving a long tail for sewing. Set Belly aside.

Snout – Make 1 with Color B
Rnd 1: Make a magic circle, ch 1, sc in the ring, 9 hdc in the ring. (10 sts)
Rnd 2: 2 hdc in each st around. (20 hdc)
Rnd 3: Sc in next st, sl st in next st, break yarn and seamless join leaving a long tail for sewing. Set Snout aside.
Bear Squish Assembly
1 – Add Ears to Body: Sew the Ears opposite each other, with Rnd 19 (back of Body) centered behind them. Curve Row 5 of the Ears slightly and sew to Rnds 4 – 6 of the Body, as shown.

2 – Add Safety Eyes to Body: Attach the Safety Eyes (or embroider them on) to Body at Rnd 14/15 (or as desired). Be sure to face the Eyes away from Rnd 19 of the Body, approximately 8 – 9 stitches apart, as shown.

3 – Finish and Add Snout: With Color C, embroider on a smile, or the face desired. Attach the Saftey Nose (or embroider it on) between Rnds at the top of the face. Sew the finished Snout to the Body between the eyes, as shown.


4 – Final Assembly: Insert stuffing or ball into Body. Use stitch markers to attach Belly to Body, making sure that the Feet are nicely centered on either side of the face. Using long tail of Belly piece, whipstitch the Belly to the Body. Weave in end.

Need More Squish in your Life?
Ready for your next project? Get all the Squishes Here! Check out the Moogly Free Patterns Page or Ravelry!

If any of the Squish patterns inspire you to make your own project, and you post a photo on social media, be sure to tag me @mooglyblog or #mooglyblog so I can check it out too!
The Fine Print
Follow Moogly on Facebook, Twitter, Pinterest, TikTok, and Instagram! Thank you to Yarnspirations for providing the materials shown in this post. Written pattern copyright Tamara Kelly 2024, all rights reserved. Please do not reprint or repost this pattern. Please do link to this page to share this pattern with others.
If you wish to make items for sale from this pattern or translate it to another language, please visit the About page for details.


